15 Dec 2016

New logo, new website and new jewellery

I have an updated logo (thanks to Hello Wilson):

I have a new website: www.machidewaard.co.uk

and I have a newsletter out with photos of new jewellery. You can see the newsletter here: http://www.icontact-archive.com/NMT5UPDz4w3Rykv22sXd3DM7vKhkrmpE

and here is some of the new jewellery:

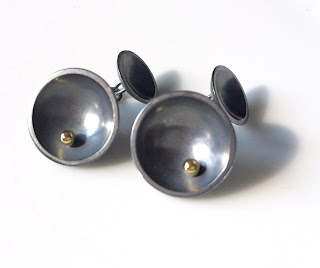
Sterling silver bubble stud earrings (now at the New Ashgate Gallery):


11 Nov 2016

Studio E174 news


A few more fireworks to go and Christmas will be with us!

Studio E174 will be opening it's doors again for a festive exhibition of work by students and resident makers
on Sundays 13th & 20th November
between 11.00am and 4.00pm

All work is for sale, we might have that special & unique Christmas gift that you have been hunting for
Join us for a glass of mulled wine and let's get in the festive spirit!
For a real Christmas treat, Loucinda, our wonderful silversmith will be running 'make you own' personal Christmas decorations at the Studio on
Saturday 26th November for Children 11 - 3
&
Sunday 27th November for Adults 10-4
Please contact us for further details
Our day and evening classes are running as always, our next sessions kick off on Tuesday 15th & Wednesday 16th November, we have limited places left, Thursday is fully booked until Christmas

We start again on Tuesday January 10th 2017
If you would like to learn how to design & make your own jewellery please contact us for further details

In the meantime, let's look forward to Christmas!
Please visit our website (under new construction) for further details.
With best wishes and look forward to seeing you soon

From all at Studio E174

2 Nov 2016

Make a silver bangle with a charm: day class

Make your own silver bangle with a charm in Chesham at the Chiltern Hills Academy.

Saturday 3 December 2016
10:00 - 15:30
£47
Silver costs not included - project cost about £15 - £20

For more information, click on this link:
http://www.adultlearningbcc.ac.uk/course.aspx?CourseID=28188&SearchCriteria=bangle&contentID=15&town=&CatID=0&dtfrom=&dtTo=&AdvancedStatus=&srch=true


24 Oct 2016

JASSO exhibition in Woodstock

On Saturday, I went to the opening of the JASSO exhibition at the Oxfordshire Museum in Woodstock. The exhibition has lots to see, from samples to silversmithing work and of course plenty of jewellery. A wide range of skills and techniques are shown. It's well worth a visit! The exhibit it on from now until 6 November. Also, the museum has a very nice tea room.

JASSO exhibit


Spot my jewellery :-)


Exhibition catalogue

Museum tea shop

3 Oct 2016

October 15 - Make your own silver ring

Fancy making some jewellery yourself? How about making a silver ring in a day: class in Chesham October 15th! See poster for details:


earrings for my sister

I made these earrings for my sister for her birthday. They are sterling silver with blue topaz. The stones are 6mm and are from Bellore (now merged with Rashbel, www.rashbel.co.uk).


26 Sept 2016

JASSO exhibitiion

JASSO (jewellery and silversmithing society of Oxford) are holding an exhibition in which I'm participating. Go have a look!


5 Sept 2016

customised cufflinks

A customer of the New Ashgate Gallery in Farnham liked the look of my cufflinks, but preferred a different type of finding. The usual findings (ie the back) of cufflinks are either:
swivel arm: where the arm swivels to be straight to push through the hole
bar: where there is a set bar and back that do not move
chain: where there is a chain in the middle and some type of back attached to the end of the chain

The cufflinks had the swivel arm finding but the customer wanted a chain finding. So here's the before photo:

And here is the finished product, now with chain and matching back:


15 Aug 2016

Jewellery Classes past and future

Last week I taught a two day course at the Missenden Abbey Summer School on jewellery making with an emphasis on tube setting. It was a busy two days and we covered a LOT of techniques and did lots of soldering!! Here are some of the results - rings with tube set 3mm CZ:


Most students also made pendants, although one students made a more complicated ring (unfinished in photo) which will hold two 5mm stones at jaunty angles to the ring shank.

If you fancy making something like this, more classes coming up in September at Studio E174 in High Wycombe! I also have classes at Chesham and High Wycombe Adult Learning Centres, for more information, see here: http://www.adultlearningbcc.ac.uk/courseList.aspx?SearchCriteria=jewellery&Page=1&contentID=&Orderby=&Direction=&town=&CatID=0&dtFrom=&dtTo=

Jewellery Making Classes in High Wycombe at Studio E174
Number of sessions: 10
Start date: 8 September 2016
Finish date:10 November 2016
Thursday 1:30 - 4:00
Number of places: 6

Number of sessions: 5
Start date: 17 November 2016
Finish date:15 December 2016
Thursday 1:30 - 4:00
Number of places: 6

Be guided through a series of projects progressing to designing and making your own individual jewellery.
No experience or artistic skills are necessary. Classes are for both beginners and those with experience.
Classes are small, up to 6 students. Due to small numbers you are guaranteed one-to-one tuition and all
the support you need to translate your ideas into finished pieces.
All our courses provide a range of hand tools and access to equipment. You will be introduced to the
workshop and given full instruction in the use of tools & equipment as the course progresses.Students
can choose to work either in silver or they can work in copper or brass. Silver is not included in the cost.

To book or for more information, please email machidewaard@gmail.com.

20 Jul 2016

Improved lace imprint hinged bracelet

Years ago, I made a lace imprint hinged bracelet. The fastening was with a little padlock clasp at the front. I was never quite convinced by it, not least because when worn, it tended to snap open a little, so it would be partly open with the padlock holding it together. In short, it just didn't quite work.
For ages, I had this idea to change the clasp to something not only more sturdy, but more in fitting with the design. Since it's lace imprint, I wanted to give it a corset-type look. Last week, I finally had some time to work on it and it turned out rather nice. The clasp works much better and stays firmly shut. There are the three clips on the front and a lip underneath with two dimples that also click the bracelet shut so it's already in place to easily line up the clips. It also looks better because the clasp is not directional - it looks fine when worn. The old version didn't work because the padlock hung in the wrong way if you moved your arm up (so looked best when not on someones arm, which is not the idea!). So, all in all a big improvement.

This is how it was:

And this is how it is now:

closed hinged bracelet


slightly open hinged bracelet
top view open hinged bracelet

6 Jul 2016

Stacking rings commission

A couple of months ago, I met someone at the Henley Arts Trail who had a big birthday coming up and wanted something special to mark that day. She had two stacking rings already - one with moonstone (her husband's birth stone) and one with garnet (her birth stone). She wanted to add to the stack with two more rings - one with another garnet (her son's birth stone) and one with green tourmaline (her other son's birth stone). So first thing was to stretch the existing rings - very carefully - as they were already a bit too tight and adding more rings means you need them to be a bit wider usually. The wider a ring, the larger the size you need. Then I made two ring bands to match the existing ones in size - 1.5mm thick horizontally and 1.4mm thick vertically. The garnet was slightly larger, at 5mm, so I bezel set that one on 1mm sheet with a hole cut out of the bottom. The green tourmaline was 4.5mm, so I tube set that one. And this is how they turned out (with the two new rings on top of the existing ones):

two new rings

all rings together

rings in presentation box

10 Jun 2016

23 June - 21 July Jewellery Classes in High Wycombe


New five-week jewellery classes are starting at Sudio E174. The starting date is 23 June and finishing date is 21 July. Each session is 2.5 hours long and the maximum class size is only 6, so plenty of individual attention! The cost is £115. To join, contact me machidewaard at gmail.com. You can see more details here: www.studio-e174.co.uk

Here are some pieces my students have been working on recently:


23 May 2016

Photographs of jewellery

A while ago I got some more photos taken with a model -- photos by Stone Photos and model is my friend Jane (most photogenic person I know!). Here are just a few of my favourites:


6 Apr 2016

Henley Arts Trail - 30 April to 2 May 2016

Henley Arts Trail is coming end of this month! Come see me at venue 9..... Click on flier for larger view.


4 Apr 2016

Visit to my cousin

What better way to spend Easter weekend than in a workshop? I went to visit my cousin who does woodworking and we spent a lot of time in his lovely workshop. My cousin makes guitars and furniture with the occassional Christmas decoration and a notable project of a ridiculously heavy cutting board commissioned by my husband. (You can read about the cutting board here: https://handguitar.wordpress.com/2015/02/23/a-solid-ebony-chopping-board/) Anyway, so we also made a piece of furniture together: a mini four poster bed for my miniature teddy bears. You can click on all the photos below to see a larger version.

The first thing was to make a plan. We drew out the plan on a piece of wood: (the bed was to be 16cm long, 16cm high and 12cm wide)


This is a photo of my cousin's bench plus looking through the windows at the other half of the workshop.

Once we had all the pieces we needed for the frame of the bed, we clamped them together to see if they fitted properly and to decide what we were going to do with the shape.
My cousin showed me how to saw with various wood saws - quite a bit different than sawing into metal!! You have to take the grain of the wood into consideration and make sure you don't let the saw wander off along the grain instead of along the line you're trying to cut. It was fun to be learning new things! I also got to use a plane, which was also new for me.
We used chisels, including an old chisel that used to belong to our grandfather. My cousin said our grandfather hadn't been particularly kind to the chisel: used it until it was blunt and then used it to mix paint! Ha! But now the chisel is all cleaned up and sharp again, so we used it to make the dips on the sides of the bed and the curved lines on the bed posts which you can see in this photo.
 Here's my cousin using a large planing machine to get a piece of wood thin enough for our purposes.
Once we had the sides and posts, we glued thin strips on the inside of the long sides of the bed for the slats of the bed to rest on later. Otherwise there's no place for the mattress to rest on!
To assemble the bed, we used small brass nails. But because all the wood was quite thin (we didn't want the wood to split), we pre-drilled all the holes and also used wood glue in between all the sections.
 Later, more clamping to make sure the pieces stayed firmly together while the glue dried.
And two photos of the bed once we finished all the fabricating. Now of course I need to make a mini mattress and bedding!

The bears approve.