10 Jun 2016

23 June - 21 July Jewellery Classes in High Wycombe


New five-week jewellery classes are starting at Sudio E174. The starting date is 23 June and finishing date is 21 July. Each session is 2.5 hours long and the maximum class size is only 6, so plenty of individual attention! The cost is £115. To join, contact me machidewaard at gmail.com. You can see more details here: www.studio-e174.co.uk

Here are some pieces my students have been working on recently:


23 May 2016

Photographs of jewellery

A while ago I got some more photos taken with a model -- photos by Stone Photos and model is my friend Jane (most photogenic person I know!). Here are just a few of my favourites:


6 Apr 2016

Henley Arts Trail - 30 April to 2 May 2016

Henley Arts Trail is coming end of this month! Come see me at venue 9..... Click on flier for larger view.


4 Apr 2016

Visit to my cousin

What better way to spend Easter weekend than in a workshop? I went to visit my cousin who does woodworking and we spent a lot of time in his lovely workshop. My cousin makes guitars and furniture with the occassional Christmas decoration and a notable project of a ridiculously heavy cutting board commissioned by my husband. (You can read about the cutting board here: https://handguitar.wordpress.com/2015/02/23/a-solid-ebony-chopping-board/) Anyway, so we also made a piece of furniture together: a mini four poster bed for my miniature teddy bears. You can click on all the photos below to see a larger version.

The first thing was to make a plan. We drew out the plan on a piece of wood: (the bed was to be 16cm long, 16cm high and 12cm wide)


This is a photo of my cousin's bench plus looking through the windows at the other half of the workshop.

Once we had all the pieces we needed for the frame of the bed, we clamped them together to see if they fitted properly and to decide what we were going to do with the shape.
My cousin showed me how to saw with various wood saws - quite a bit different than sawing into metal!! You have to take the grain of the wood into consideration and make sure you don't let the saw wander off along the grain instead of along the line you're trying to cut. It was fun to be learning new things! I also got to use a plane, which was also new for me.
We used chisels, including an old chisel that used to belong to our grandfather. My cousin said our grandfather hadn't been particularly kind to the chisel: used it until it was blunt and then used it to mix paint! Ha! But now the chisel is all cleaned up and sharp again, so we used it to make the dips on the sides of the bed and the curved lines on the bed posts which you can see in this photo.
 Here's my cousin using a large planing machine to get a piece of wood thin enough for our purposes.
Once we had the sides and posts, we glued thin strips on the inside of the long sides of the bed for the slats of the bed to rest on later. Otherwise there's no place for the mattress to rest on!
To assemble the bed, we used small brass nails. But because all the wood was quite thin (we didn't want the wood to split), we pre-drilled all the holes and also used wood glue in between all the sections.
 Later, more clamping to make sure the pieces stayed firmly together while the glue dried.
And two photos of the bed once we finished all the fabricating. Now of course I need to make a mini mattress and bedding!

The bears approve.

11 Mar 2016

Tube!

One of my students said I should have called my last post "File Files" so I tried to think of a lame pun for tubes, but couldn't think of anything. Anyway! Tube making! I like to make my own tube because I like the process but also because it means I can make exactly the size I want. Of course, you could draw down seamless tube bought from a supplier, but I do just like the feeling of achievement that comes from producing some tube from flat sheet. Also, I get to use one of my favourite tools: the drawbench. Luckily, there is a drawbench at Studio E174 (new classes starting in April!). Here it is: (click on the photo for larger view)

The drawbench allows you to pull wire and sheet through the drawplate that you wouldn't be able to with just your own strength. If you're only drawing down small wire, you can put your drawplate in a vice and pull it through yourself. You can use regular pliers, you don't have to have draw tongs. The draw tongs do make it easier, as they're made for the purpose! The tongs have a very flat nose so they can butt right up to the drawplate. And they have lots of tiny teeth to grip the wire/tube.

If you're drawing down wire, you are either making it the same shape but a smaller width (for example, 1mm round wire down to 0.5 wire) or you're drawing it into a different profile shape (for example, from round wire to square wire). There are a variety of reasons for doing this - maybe you want to harden your wire, maybe to need smaller wire, maybe you need a bespoke size wire that isn't available from bullion suppliers. The last is especially true for gold, since it's sold in a more limited range of sizes than silver. When it comes to tube, it means you can get exactly the size you want and you can experiment with different profiles as well. Anyway, the drawbench holds the drawplate at one end and holds the tongs along the top and you crank the handle to pull the tongs along and pull your wire/tube through the drawplate.

To make tube, you cut a piece of sheet with a sort of ant-eater nose at one end. Then you start with the largest hole in a drawplate of large size holes and slowly work your way down in size. Lots of annealing is required and the point of your sheet will break off and need to be filed back into a decent point so it can fit through the drawplate. Do not make the sheet too wide to start with, as with this copper example (middle piece), or the sheet will cross over instead of meeting in a seam.

If you're using a very expensive metal, or you just like being super thrifty, it's best to solder on the nose in copper so you don't lose any silver/gold when the nose breaks off. If you're using pre-made seamless tube that you're drawing down, you can solder a bit of copper wire inside one end and file it into a taper.
Here's the set up with the drawplate at one end, the silver tubing sticking through the drawplate and the tongs gripping the tube.
Here's a close up:


If you're working with a larger piece or it's all being rather difficult, you can also use a lubricant like wax to help the wire/tube move more smoothly. Drawplates can be bought for a range of budgets. If you're going to be using them lots, then a more expensive one is worth it - the drawing down is smoother, the resulting shape is more consistent and neater. Some cheaper drawplates aren't that well made, so they leave grooves or lines on the finished piece. It depends on what you're doing if that's important or not.

In the first photo, we have the tube as it's coming together, the forming of the seam. In the second photo are the finished bits of tube (which I use for brooch findings). I straightened it just by hand. You can also roll it between two bits of steel to straighten. You can solder your tube seam shut at this point, but as I only use very small pieces at a time, I solder seam down on the piece so it's soldered shut at that point instead.This is obviously not an exhaustive post about tube making - you can read more about tubing by he-of-the-brilliant-name, Charles Lewton-Brain over on Ganoksin here: http://www.ganoksin.com/borisat/nenam/tube-hints.htm

15 Feb 2016

Cleaning rusty files

One of my students over at Studio E174 discovered recently, after cleaning out her parents' garage, that her father had had quite a thing for files. He had an enormous stash of files in a corner of the garage - huge ones, small ones, one with handles, ones without.....but mostly all quite rusty by the time they were found! Kindly donated to the studio, I set about cleaning them.

So, after careful research (ie lots of Googling), I settled on a method to clean the files. I found a bunch of different approaches online to getting rid of the rust, but most approaches came down to four options:
1. vinegar
2. vinegar with salt added to increase its acidity
3. vinegar with baking soda to make a paste to apply to the files
4. commercial anti-rust products which were mostly on American sites (so I wasn't sure I could get them here in the UK)

After reading lots of blog posts and watching quite a few nerdy tool videos (this one is very interesting, useful information about how to easily remove residue in your files from softer metals: https://www.youtube.com/watch?v=bIZll_eqHY4), I went for the vinegar bath approach. I thought adding salt might make it too acidic and eat at the teeth of the files. I couldn't see how the paste would be strong enough, as I sometimes use that for domestic cleaning and it's pretty mild. And lastly, I didn't want to spend much money, so vinegar sounded cheaper than trying to hunt down commercial rust-removers. Happily, distilled white vinegar from Tesco is 39p for a 568ml bottle.

So, step one was to remove all the handles. Step two was to leave the files overnight in a bath of vinegar. Here they are in their bath:

Step three was to (with gloves!!) scrub the files with a steel brush (I got mine from Clas Ohlsson for £2.79, I'm sure most DIY shops will have them). By this time, the rust was loose, so some hard scrubbing with the steel brush was all that was required. Helpfully, the vinegar also loosened paint remnants that were on some of the files.
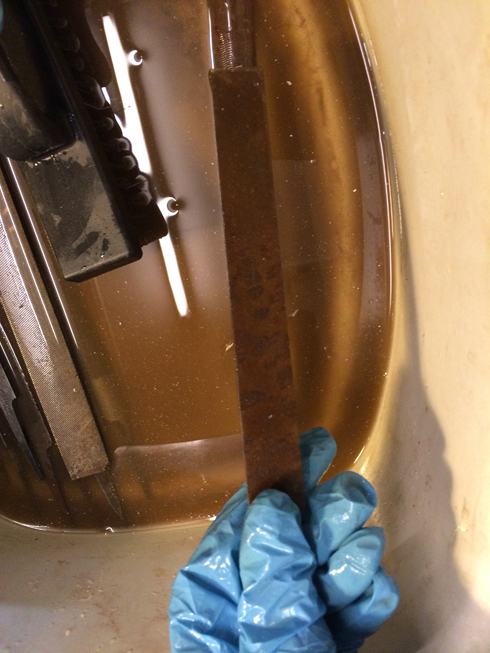
After this, I foolishly left it a bit long before I dried and oiled the files, so in the end I did a second vinegar bath and a second lot of scrubbing. I think it was useful anyway, as some of the files were very rusty, such as this one:
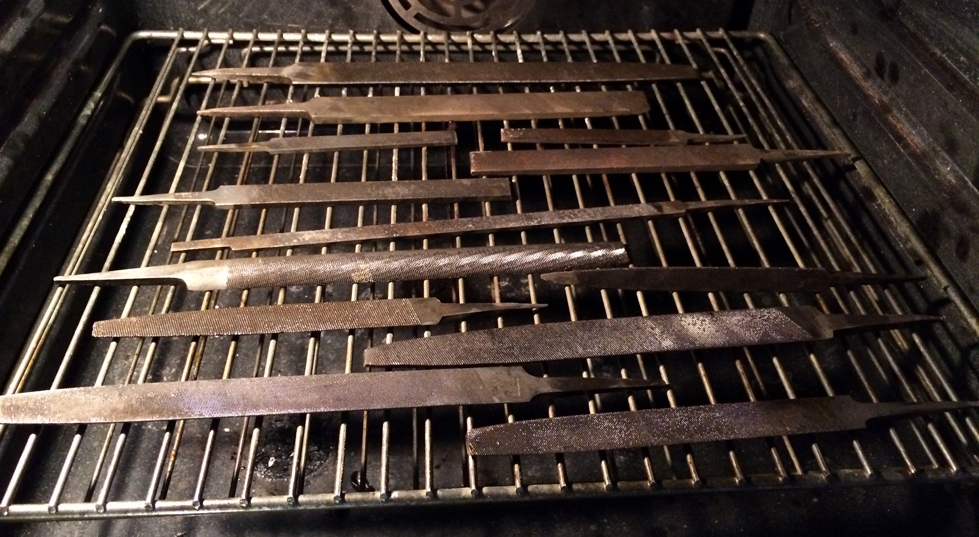
After the second lot of scrubbing, I dried the files thoroughly by putting them in the oven for 10 minutes at 100C.

After that, I covered them with a bit of oil. I used this oil:
And then I put the handles back on the ones that had handles. Now they look pretty good again and certainly usable.


update: I managed to find some more handles, so now they all have handles too!

5 Feb 2016

New class dates announced for Studio E174 in High Wycombe

Jewellery Making Classes in High Wycombe at Studio E174
Thursday 14 April - Thursday 16 June 2016
1:30pm - 4:00pm
£230 for 10 weeks

Thursday 23 June - Thursday 21 July 2016
1:30pm - 4:00pm
£115 for 5 weeks

Be guided through a series of projects progressing to designing and making your own individual jewellery.
No experience or artistic skills are necessary. Classes are for both beginners and those with experience.
Classes are small, up to 6 students. Due to small numbers you are guaranteed one-to-one tuition and all
the support you need to translate your ideas into finished pieces.
All our courses provide a range of hand tools and access to equipment. You will be introduced to the
workshop and given full instruction in the use of tools & equipment as the course progresses.Students
can choose to work either in silver or they can work in copper or brass. Silver is not included in the cost.

To book or for more information, please email machidewaard@gmail.com.

The studio is located here:
Studio E174
1st Floor, Block B
Commercial Square
Leigh Street
High Wycombe
Bucks HP11 2RH

2 Feb 2016

Missenden Abbey Summer School Course in Jewellery

I'm very happy to say I'll be teaching a two-day course at Missenden Abbey this summer! The course will be silver jewellery with an emphasis on tube setting.

You can click on the picture below for the full details. If you have any specific questions about the course, please feel free to contact me!

Date: 11 - 12 August 2016

Make your own silver jewellery with an emphasis on tube stone setting.
Beginners will be guided through a silver ring project, learning metalwork techniques such as piercing, filing, soldering, sanding, polishing and stone setting as you go. Instruction will be given in the use of tools, including those specific to tube setting. Intermediate students can choose from four set projects (two types of ring and pendant) involving tube setting or create their own design. More experienced students can make their own design or follow the projects and will be shown more advanced tube setting options.
Materials for the set projects will be available to purchase from the tutor (about £7 - £12 per project). Three sizes of tube and corresponding cubic zirconia stone will also be available to purchase from the tutor. If you wish to provide your own materials or have any you feel will benefit the project please feel free to bring them.

To book, call Missenden Abbey on
01296 383582 or visit http://www.missendenabbey-al.co.uk/arca/ for more information.

Click on the picture below for a clearer view:


4 Jan 2016

Christmas cufflinks

These cufflinks were a Christmas surprise for a certain member of the Reading Male Voice Choir which I made with the RMVC logo set with a type of varnish into silver frames.


30 Nov 2015

Jewellery Classes in High Wycombe

Classes will be starting again at the end of January:

Jewellery Making Classes in High Wycombe at Studio E174
Thursday 28 January - Thursday 31 March 2016
1:30pm - 4:00pm
£230 for 10 weeks

Be guided through a series of projects progressing to designing and making your own individual jewellery.
No experience or artistic skills are necessary. Classes are for both beginners and those with experience.

Classes are small, up to 6 students. Due to small numbers you are guaranteed one-to-one tuition and all
the support you need to translate your ideas into finished pieces.

All our courses provide a range of hand tools and access to equipment. You will be introduced to
the workshop and given full instruction in the use of tools & equipment as the course progresses.
Students can choose to work either in silver or they can work in copper or brass. Silver is not
included in the course cost.

To book or for more information, please email machidewaard@gmail.com

I also offer private lessons at my studio in Reading. Last week I had two students for a day class on how to make silver rings. It was a lovely day and they succesfully finished three silver rings each:


13 Nov 2015

collaboration

My cousin does woodworking (you can see his blog here: handguitar.wordpress.com) and we decided to do a collaboration combining his woodworking and my metalwork. So, he made this jewellery box:


And I've made these two hinges and one clasp. They are all round, of course, given my propensity for making circles. They all have tiny countersunk holes for nails which I have yet to make, but will be forthcoming at some point. We think we're going to have to also glue (with epoxy) the hinges and clasps on for added strength. He's also going to add a chain on the inside of the box to reduce strain on the hinges. Since we're in different countries, it's going to take a while to get a photo of the finished project! Especially as initially, we thought he'd be able to put the hinge on but now I think it's going to have to be done with a riveting hammer and I'll need to clean up any accidental marks on the flat part of the hinge. Also, I'm pretty sure we'll need pilot holes for the silver nails, which will require some of my 0.5mm drill bits. Anyway, luckily, I'm seeing my cousin tonight so we can discuss the details! Fun to do something together and any excuse to talk about tools and maybe needing more tools....


8 Oct 2015

A difficult question to answer

There's a question that I think most makers of art or craft get asked quite often, which is "How long did it take you to make?". I always find myself at a bit of a loss as how to answer, because it's not as straight-forward a question as some might think. For me, some pieces that I've been making for a while can be made in several hours. But that's not really the answer to the question. There are the hours, and sometimes months (or longer!), of turning over a design idea in my head, working out how it would work. That's usually the beginning of every design - lots of thinking about the details of making, what order the pieces would need to be soldered in, what thickness the wire/sheet/chain would need to be, what metals or plating would be involved, what tools would be needed, etc. I like to think it through before starting. Then for a piece that's being made for the first time, there are the mistakes - sheet too thin, sheet too thick, need more of some material that I don't have, problems with the order of soldering, etc. When the piece is finally made, then the small adjustments can continue for months or longer. They may not be visible on the end piece, but they will be small improvements that make it quicker or easier or less costly to make the piece. Then, after perfecting the process and the finish, only then can I say "now I can make this piece in X hours".

To illustrate, I made a series of oval pendants (now at Jam Eton) and I knew what I wanted them to look like and I also knew that I wanted them to work as a series. Not because they need to stay together, they don't and they are separate entities, but I wanted a certain cohesion between the pieces. I like to have an aesthetic continuity that makes it feel like a collection. Anyway, first I made this pendant:

Then I knew I wanted to make another one that also had a hole, but this time a hole with tapered edges. But I really wanted the hole to be the same diameter: 11mm. And I wanted the taper to be clear, not so shallow that it looked too similar to this pendant. So I worked my way through various techniques to try to get the exactly slope that I wanted with the exact diameter. It was a long slow process that had many failed attempts with lots of thinking about what to try next to get to the result I wanted. I made tools, borrowed tools, looked up techniques in books and searched the internet.


Here is a photo of just some of the attempts, including too thin, too thick, too big, too small, too hard (working out how many times and when to anneal) and so on.


Eventually, I did work it out and got exactly the result I was after, which concluded in the finished piece with a shiny tapered center:

That kind of process makes it so hard to answer the seemingly simple question of "How long does it take to make it?".

2 Oct 2015

Flavour of the Month at Jam Eton Gallery

I have been hard at work and now have 15 new pieces of jewellery over at Jam Eton this month - live on the Jam website as well (http://jam-eton.co.uk/makers/machi-de-waard.html). There is a new series of oval pendants with matching oval clasps, two other new necklaces (one flat, one concave), two new pairs of cufflinks, new brooches and new pairs of earrings. Below are some photos of the oval necklaces.You can see everything if you come visit Jam, or visit the Jam website. The fifteen new pieces are with fifteen pieces I already had at the gallery, so 30 lovely bits of jewellery to look at!!